End Of Semester Post

The time has finally arrived for the end of my fundamentals of digital and online media class, and with it the end of semester for which I could not be happier. since it is the end of semester I am writing a summary of my blogging experience thus far. To start with I am going to talk about WordPress features that I liked the first one is the ability to promote your blog right from your post to the social media site of your choosing. Another great feature that I have enjoyed working with is the way that you can add media it is supper easy to add photos, videos, and slide shows once you have figured out how to do it. In contrast, I found that the widgets were difficult although they were great once you got them working. Unfortunately, I was not able to get my Facebook account to connect for a widget.

As far as the blogging goes I would not change anything about them except for the frequency that they are due because I feel like they should be due more often than they are. I feel like the skills that I have learnt from this class have help me to be more literate when it comes to technology. It has also taught me to think about what site I am using and how I should or should not promote on it. It has also changed the way that I look at and post on Facebook. It also has helped me to understand just how difficult it is to create and maintain a website, I have a new-found respect for people that code for a living. 

When it comes to WordPress I have not managed to get many visitors or views. Thus, far my busiest week was the week of February sixth where I had nineteen views and eleven viewers. That week I promoted my blog on Facebook. The blog post that has had the most views is my blog review with 8 views. However, my homepage/archives with 31 views. I believe that my blog review was the most popular because it was linked to a blog that has a following and the lady that I reviewed commented on my post.     


Herbal Tea Bath Bombs 

Bath bombs are great but every now and then you just want to do something a little different with them.  This is when I make herbal tea bath bombs. I like them because instead of using essential oils that can irritate the skin and food coloring that if not used sparingly can dye the bath tub and or your skin.

They are also great for using with small children because they are made with all edible ingredients so you do not have to worry about them drinking the bath water as children are known to do from time to time. I also like to make these bath img_1117.jpgbombs because they can be made with any herbal tea you like. I like to use teas that smell good especially chai tea.

To make these bath bombs you need three tea bag of your choosing. You will open two of the bags and mix them into your dry ingredients. With the third tea bag, you will brew about half a cup of really strong tea. The tea will be used in substitution of the liquid ingredients in the bath bomb recipe but you may still want to add some of the oil for skin benefits. When adding the tea remember to add it sparingly so that you do not add to much liquid, the consistency should be that of wet sand.       

Bath Bombs

Today we will be making bath bombs. Making bath bombs is a fun and easy craft to do for adults and children. I personally like to make them in my spare time with my friends and family. They are great because they make great gifts and are relatively inexpensive to make.

The reason that they are such a great activity is that they are so versatile. When you make, bath bombs you can add several different ingredients  to make them something special and new depending on what you like. Personally, I like to make them with essential oil and maybe a little food coloring. I have also made them with glitter and rose petals, and I have seen them with things like toys and even rings inside them.

I have decided that I will try to make them with hidden color in them. The way that I am going to do this is that I am going to make the bath bombs like normal but only fill the mold half way then I am going to put a drop of coloring in them then wait for them to stop reacting to the liquid and finish filling the mold and then wait for it to dry. One thing to remember with these bathe bombs is not to overfill the molds because with the extra liquid they may react and expand out of the molds. When I pop them out of the molds they look just like a normal bath bomb.

Body Butter

Today we will be make home made body butter. Making home made body butter is one of the most complex products that I have made so far. That beings said however it is not as difficult to do as I had expected it to be. The biggest problem with making body butter is that you need to be very patient and follow all of the directions very carefully.

body butter
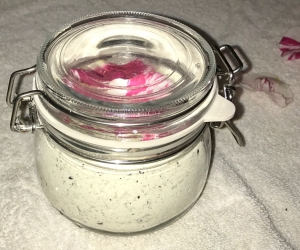
In order, to make it one needs to buy coco butter, shea butter, and jajoba or almond oil.  I used Amazon.com to purchase all the ingredients I needed for this project. I found most of them in the grocery store but amazon.com has them for a much better price. Unfortunately, I listened to the recipe and made this with unrefined coco butter and shea butter and they collectively smell like chocolate which makes the body butter smell like it also.  Luckily, I was thinking when I made mine and scented it with orange oil so it smells like a chocolate orange.

When making this product, you will need a food scale to weigh out each ingredient for accurate measurements. This product is great for hands and feet and if you have dry skin then it is good for general use. However, if you have oily or acne prone skin then you should probably try to do less oil.


Soap Making


This slideshow requires JavaScript.

I don’t know about you but I am constantly seeing specialty soaps when I am out shopping but who in their right mind wants to pay $10 plus dollars for a bar of soap. I can honestly say not me so I started soap 11looking into how to make soap online. Unfortunately, I was traumatized by a bad experience of making soap in a high school chemistry class where the teacher used an old pickle bucket to make it and it made soap smell like pickles and was so sticky that it broke my molds when I tried to get it out. I also remember it using some pretty heavy duty chemicals that I do not want to work with. But as always, the frugal person that I am won out and I looked up recipes for it.

Luckily the majority of the recipes and YouTube soap 10videos that I have found do not require me to make soap from scratch. They require me to make soap with a product called soap base. With this product, you cut pieces off of it and then melt it in the microwave then you mix in your scent and coloring and pour it into molds. Then you simply let it cool and pop it out of your molds which is supper easy if you use silicon ice cube trays like I do.


Recently I have discovered that rather than making soap in individual soap trays, I have started to start make my soap in a loaf pan and then cut it into individual bars. One thing to keep in mind when IMG_0768using a loaf pan for this is if it is not silicone then you should line it with parchment or wax paper for easy removal. I have also started to used different types of soap base in my bars as well as dyeing it more than one color to make different patterns and designs in my soap. I also like to make soap in a loaf pan like this because it makes bigger and more traditional size bar of soap that is great for giving to people as a gift. Once you are finished you cut the bars with a knife and enjoy it.  

In-Shower Lotion

With the dry, itchy skin that I have from the cold weather that we are getting I feel like it is a good time to talk about making in-shower lotion. This winter I purchased the Nivea in-shower lotion but I am finding it to be quite expensive, so I thought that maybe it was time to start making it for myself. I looked online and  found a recipe and I am hopping that this stuff works as well as the Nivea does.

In order to make this I decided to look online and see if I could find a recipe, I was lucky and found many of them. In the end I went with the one that seemed easiest because it had detailed instructions. The recipe I used is from the website One Good Thing by Jillee.

If this stuff is half as moisturizing in the shower as it was on my skin IMG_0760
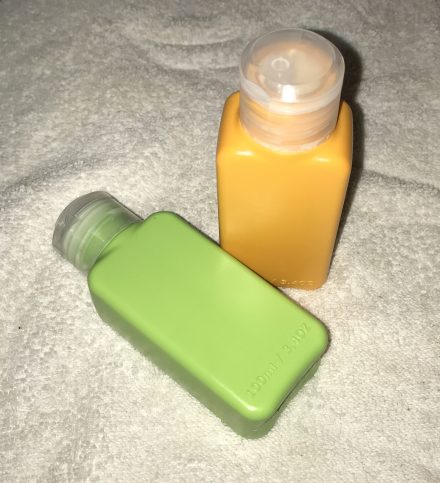
while making it, it will be wonderful. Unfortunately, when I made this I forgot to put essential oil in it so it is unscented. I also fear that I may not have let this cool long enough before mixing it and that it may have solidified in the bottle. Luckily the ingredients in this will melt with heat so it can be run under warm water and used.  I also feel that if I had waited longer for it to cool then it would have fluffed up more and made more than the two travel size bottles that it did.

Scrubs

Today I will be talking to you about the vanilla brown sugar scrub and a sweet orange coconut oil salt scrub. These are extremely easy recipes to make. They only take three ingredients which makes them extremely inexpensive, and since they are mostly household items you may find that you don’t need to buy any of the ingredients that it takes to make them.

One thing that you should keep in mind when making these recipes is that you should put them in a jar that you can fit your hand in. Another thing to keep in mind is the type of scrub that you want to make. For instance, do you want it for hands or feet. If it is for your hands, then it should be a finer grain of salt or sugar and if it is for your feet then you will want a coarse grain of salt or sugar.

Sweet Orange Salt Scrub
  • 1/2 cup coconut oil
  • 1/2 cup sea salt
  • 4-8 drops sweet orange essential oil
  • coloring (optional)

The first recipe is a foot scrub that is made with coconut oil, coarse sea salt, sweet orange essential oil, and optional food coloring for color. I like the way that this salt looks and smells; however, if you are at all familiar with coconut oil you know that it hardens when it gets cold, which is the flaw with this scrub when it cools it is extremely difficult to get out of the jar. Although, this is easily remedied if you put it in the microwave for a few seconds or run the jar under hot water.

Vanilla Brown Sugar Scrub
  • 1/2 cup olive oil
  • 1 cup brown sugar
  • 1/2 teaspoon vanilla

The second recipe is a hand scrub that also has only three ingredients. The first is brown sugar, the second is olive oil, and the last is vanilla. This scrub much like the last one smells great, in fact good enough to eat. However, unlike the other product this one is also safe to use on children because it is made of all edible products. When making, this scrub add the oil last and not all at once and only until it reaches the consistency you desire.


Blog Review

Today I am going to be writing about a wonderful blog that I have discovered. It is called the Beauty and Food Lab and is a blog about different beauty and bath products. In this blog the writer recommends products that are good to buy for the current season. It also has recipes for different products that you can make. The recipes that it gives are for beauty products as well as healthy living products. In her blog, not only does she recommend great products but she also shows pictures of the products that she makes and recommends.

When I looked at her blog I was impressed by the products that she is making and the recipes with detailed instructions that she has provided.After reading through them I decided that it would be a good idea to test one out, and because my blog is about bath products I decided it would also be a good idea to try to make her Moroccan Luxury Milk Bath recipe. It looks amazing and I am hoping that it will smell just as amazing in the jar and in the bath.

After making this recipe and being 
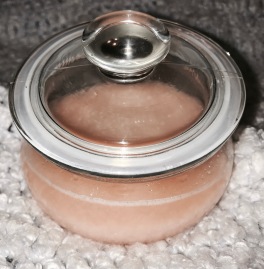
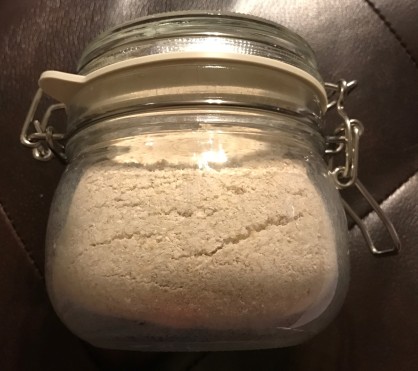
very impressed by it. I can’t help but to think that this blogger really knows what she is talking about. I really enjoyed making this product. It smells amazing as it is a blend of orange and rose with a hint of cardamom. If it smells half as good in the bath as it dose in a jar it will be incredible.

Winter Wonder

For my first product post, I thought that I should do something simple for those of you who are just starting out making bath products. I also thought that this would be appropriate because of the season. A good soak with this is a great way to kick that dry itchy winter skin. It is also a great home remedy for an eczema outbreak.

Enough of the suspense today we are making oatmeal-bath. Oatmeal bath is made by taking any type of uncooked oatmeal. When I first started to make, it I used organic uncooked whole oats but recently I used Quaker Quick oats and it worked just as well as the organic but at a much better price.  Then you putting it in a blender, food processor, or even a coffee grinder until it is the consistency of flour. After that you take one quarter to half a cup and add it to running water.

Oatmeal bath is also great because you can store it for long periods of tphoto-5ime just like oatmeal and just use it when you need it or because it is so easy to make you can just make it to use right away. When it comes to storing it, I like to put it in an air-tight jar that I bought at Ikea for $2.49 but I have also used mason jars which I buy in bulk and can get for about $0.40 each. I live in a humid climate and store them in my bathroom and do not want it clump together or go bad so I do feel that it is better to sore them in air-tight jars. If you live in a dry climate like the desert you could just store it in a plastic bag or any non-air-tight container. 


First blog post

 Getting to Know Me

Hello my name is Felicia Day, I am currently living in Austin Texas. I am attending Texas State University where I am a junior, majoring in General Studies. For more information about my degree please follow the link provided bellow. Throughout this blog, I will take you on a journey of the different successes and failures that happen while making bath products so that you can learn the best ways to make them without having the issues that I have had.

I feel that sharing these experiences with people will show them ways to save money by making their own bath products. I don’t know about you but for me I hate going to the store and spending a bunch of money on Bath Bombs, Sugar Scrubs, and Muscle Soaks only to watch them wash down the drain at the end of a bath it almost feels like pouring money down the drain. Which is what lead me to start looking online for inexpensive alternatives to the things I was buying at the store. That is when I discovered recipes for making them myself.

When I first started to make, them I was a little worried that they would be difficult to make. However, when I looked at recipes online I realized just how easy it is to make bath products, and started to feel more confident with the idea of making them. I also discovered that it really is quite inexpensive unless you are like me and buy your supplies in surplus.  

In order for everyone that reads my blog to be able to make these bath products I will be posting links to the websites that I use. I will also be posting finished photos of the bath products that I have made.  will also post notes for any modifications that I have made to the recipes

photo-4